Import Equipment Modules from Excel
Workflow Overview
The Equipment Module import functionality allows the user to bring detailed information from an Excel file into AseptSoft. Imported data refers to P&ID information about Engineering Items and configurations values for chosen Equipment Modules. The Excel file used for import can be the result of a previous export (see Export Equipment Modules to Excel for more information), or can be manually created if the table structure is in accordance to the export convention.
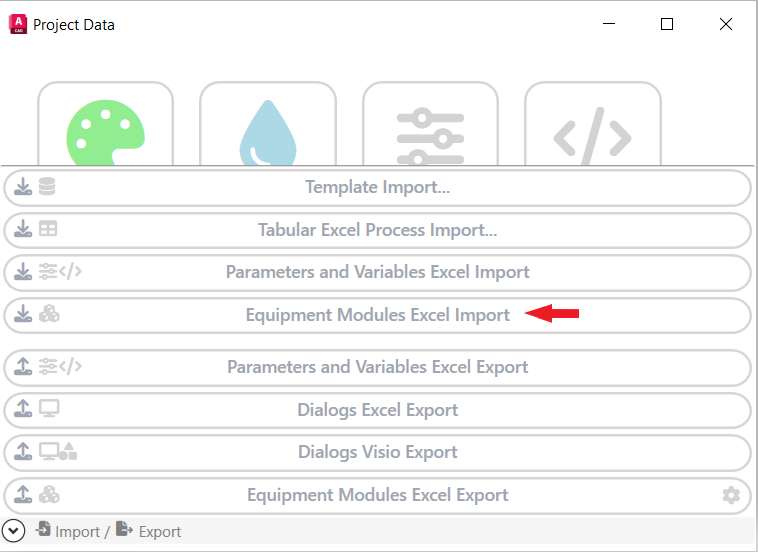
In order to access this functionality, the user can click on the button indicated by the red arrow from the Module Data window.
Data from the Excel file will be reviewed inside the dedicated import window, at which point adjustments and necessary specifications can be made. Each Equipment Module will be assigned a Configuration Template. Inside the Template, a Template Item will be linked to each Engineering Item. The Templates and Template Items assigned can be already existing ones for which the user wants to import updated information, or new ones.
After the import has taken place, the data can be further accessed in the Module Data window and the Equipment Module Ribbon.
Import File Structure
The Excel file will have to follow some usage conventions in order for the import to work properly.
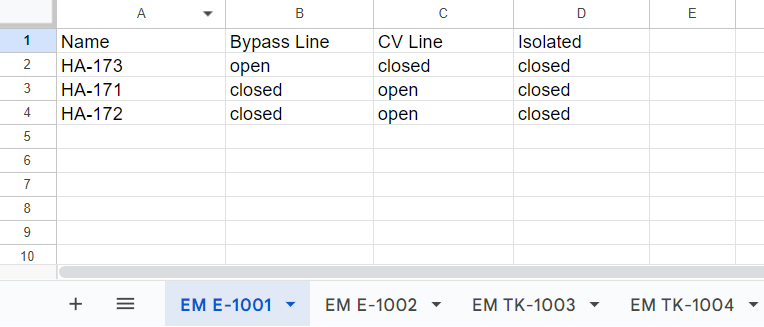
Let’s consider the above image representing the content of a compatible Excel file. Notice how each sheet contains a single Equipment Module’s data. Let’s take EM-E1001 for example. Each line corresponds to an Engineering Item and each column corresponds to a Configuration. Any cell placed at the intersection of an Engineering Item and a Configuration represents the State of the Engineering Item in that Configuration.
Example:

In this case, the circled state “Open” describes the Engineering Item HA-171 in the configuration “CV Line“.
Import Window
The import window is designed to allow the user to make necessary adjustments before bringing the data from the Excel file. Let’s see how the file data is going to be translated in the following picture.
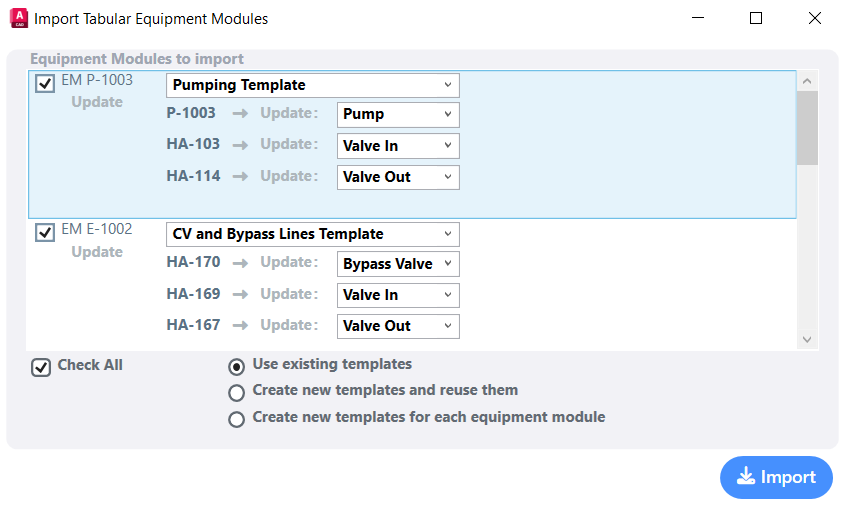
You will notice a list of all the different sheets in the Excel file, translated as Equipment Modules.

Each Equipment Module is represented in the list by it’s name, circled with red in the nearby image. The blue circle highlights the status. That can be either “Create“ if the EM is a new one, or “Update” if an existing EM with the same name is detected, meaning that all changes from the import file will impact the existing EM. The checkbox can be used to exclude one or more of the EMs from the import. Any unchecked EMs at the time of import will not bring any data from the import file.
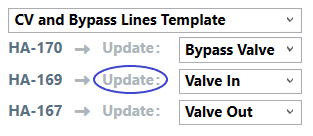
On the right of each Equipment Module there is a topmost dropdown which can be used to assign a Template. After that, each Engineering Item points to a box that will link it to a Template Item. The status of each Engineering Item link (circled in blue) can vary between the following options, depending on the Template Item selected:
“Create“ - If the Template Item is newly created for the chosen Template;
“Update“ - If the Template Item already exists in the chosen Template;
“Exclude” - If no Template Item is selected, the link is listed to be excluded from the Template.
If an Engineering Item is part of an Equipment Module but is missing from the Excel file (or the corresponding row was manually deleted), the window will show the Engineering Item as “Excluded“. This allows the user to undo the operation by selecting a Template Item for the excluded Engineering Item, in which case the historical States of that Engineering Item will be restored.
Suggestion Logic
At the bottom of the window, the importer offers three options regarding automatic detection and completion of the Template and Template Items dropdown boxes. These choices can be overwritten at any point by the user. By default, the “Existing Templates“ suggestion will be preselected.

Using Existing Templates
This option is especially useful when trying to import changes after an Export Equipment Modules to Excel operation. The algorithm will try to find out if a pre-existing Equipment Module with the same name had a historically assigned Template and select that one. Furthermore, any existing links between an Engineering Item and a Template Item will be restored. If an existing EM or a linked Template cannot be found, a new Template and new Template Items will be created for the imported EM.
Note that the historical Template choice and its links will only be restored if they are compatible with the current table data. See the following sections for explanations.
Creating New Distinct Templates
This option will create new Templates and new Template Items from scratch. Each Equipment Module will be assigned a distinct new Template and each Engineering Item will be linked to a distinct new Template Item.
Creating New Templates With Reuse Option
This option will suggest new Templates and Template Items, while trying to create as few of them as possible. This means that if a new Template is created for an Equipment Module and the algorithm finds that it’s compatible with another EM as well, it will reuse the Template as many times as possible. Same goes for Template Items, which will be reused between EMs with the same chosen Template.
See Template and Template Item compatibility subsections for more information.
Choosing a Template
Each Equipment Module will have to be assigned a Configuration Template. This will allow the Engineering Items from the P&ID to be linked to Template Items. Choosing a Template is easily achieved by editing the dropdown marked by the green arrow for the desired EM.

When the dropdown is expanded using the downward facing arrow, the user will be shown a list of all compatible templates. Furthermore, the list is automatically filtered based on the preferred suggestion type, meaning that for the “New Templates“ options, only newly created Templates will be suggested, whereas for the “Existing Templates“ suggestion type, only existing Templates will be suggested.
It is also possible to overwrite the suggested entities. That can be done by placing the cursor inside the mentioned box, typing another name and finally pressing Enter key to ensure the change is saved for import.
Template compatibility
The purpose of a compatibility check between templates is to avoid import collisions where a single Template would be mistakenly used in two or more different ways, becoming inconsistent. Template compatibility is defined by the following logic:
Number of Configurations between two entities has to be equal.
Configuration names between two entities have to be the same.
In other words, in order for two entities to be compatible Template-wise, they have to be described by the same Configurations. Template compatibility is checked in multiple contexts inside the importer. This can be verified to see if an Equipment Module can use an existing Template or to reuse a new Template that is active in another Equipment Module.
Example:
Let’s consider the Equipment Modules in the pictures below. TK-1003 and TK-2005 are not compatible to use the same Template because TK-1003 contains one more configuration called “Passive“.
Equipment Module TK-1003

Equipment Module TK-2005

Linking Template Items to Engineering Items
Linking a Template Item can be achieved by editing the content of the dropdown boxes beside each Engineering Item, as indicated by the blue arrows in the picture below.

Clicking on the downward facing arrow of a box will expand a list of possible Template Item suggestions, color coded by compatibility type. Regardless of the Template chosen, the user can also add a new Template Item by placing the cursor inside the box, typing another name and finally pressing Enter key to ensure the change is saved for import.
Linking Template Items to Engineering Items can only be done after a Template has been chosen for the selected Equipment Module.
Item compatibility
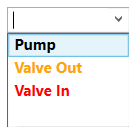
Item compatibility applies to the use of an Template Item in multiple contexts, meaning two or more Equipment Modules with the same active Template. For accessibility purposes, the different compatibility scenarios are color coded as follows:
Template Items marked in Black are fully compatible to be used in that context. This means that either the Template Item is never used elsewhere and is free of restrictions, or the other context in which it’s used features the same States in the templates' Configurations.
Template Items marked in Orange are compatible but require permission from the user in order to be assigned. These Template Items are found by the importer to be used in a pre-existing Equipment Module with different values. This can occur during the normal use of the software when the user exports data to an Excel file, edits it, then attempts to bring the changes back to the P&ID.
Template Items marked in Red are incompatible for use in the desired context. This happens when a Template Item is already in use with different Configuration States in other Equipment Modules from the current import. This situation can be solved by assigning a different Template Item to the other use cases, after which the first Template Item will reevaluate its compatibility in the first EM.
Accessing Imported Data
Once the import has taken place, the user can easily access the data by clicking the Equipment Modules icon from the Module Data window as shown in the image below.
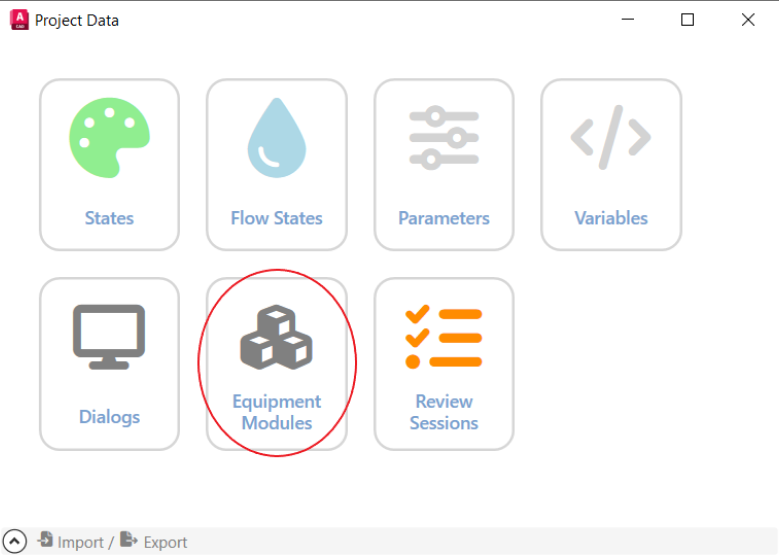
That will open a list of all existing Equipment Modules, including the ones just imported. Clicking on either one of the EMs will open an editing window which allows the user to configure all related information, as shown in the Equipment Module page.
A more direct way of monitoring Equipment Module data is to select one or more of the Engineering Items inside an Equipment Module in the P&ID, which will automatically open the Equipment Module Ribbon.
Workflow Example
The following example will serve as a simple guideline through some of the most common use cases of the Equipment Module importer.
First, let’s have a look at how the Excel file will be edited prior to using it for the import.
Excel file changes:
For Equipment Module EM-1001 we change the status of Engineering Item HA-171 in Configuration “CV Line”;
For Equipment Module EM-1002 we remove an Engineering Item;
For Equipment Module P-1003 we add an Engineering Item;
For Equipment Module P-1004 we add a Configuration.
EM-1001 before edit

EM-1001 after edit

EM-1002 before edit

EM-1002 after edit

P-1003 before edit
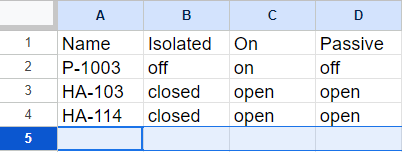
P-1003 after edit
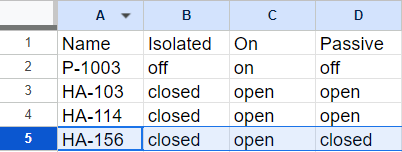
P-1004 before edit

P-1004 after edit

Importer adjustments:
Now let’s open the importer window and see how our updated data is received. First, we open the Module Data window.
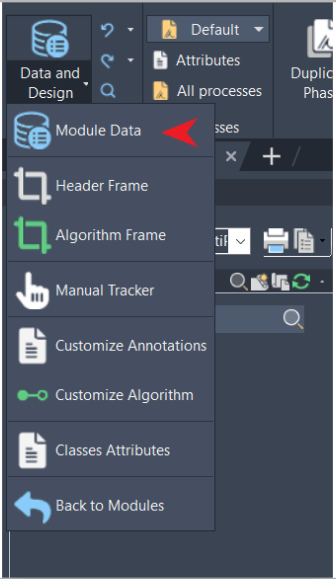
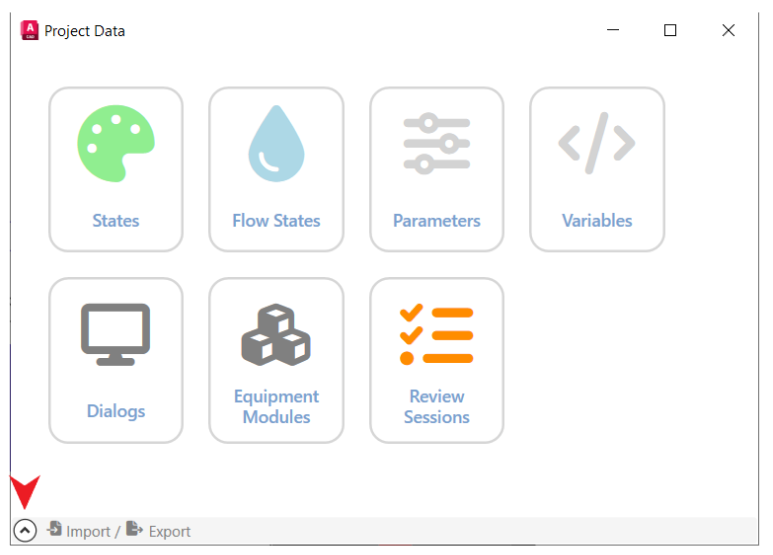
From there, a click on the upward facing arrow will open the Import/Export options.
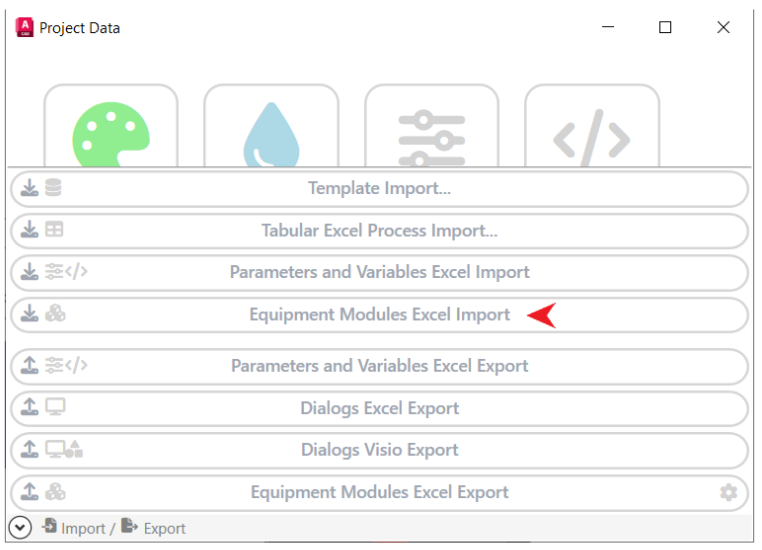
We choose the “Equipment Modules Excel Import“ option, which will require us to choose a file for import. We select the earlier edited file.
Once a file is chosen, the importer window will open and allow us to scroll through the received data. For the purpose of this example, we will leave the suggestion type as “Use Existing Templates“.

Notice that the file also contains other Equipment Modules than the ones we edited. Those can be disabled from import by unchecking their boxes.
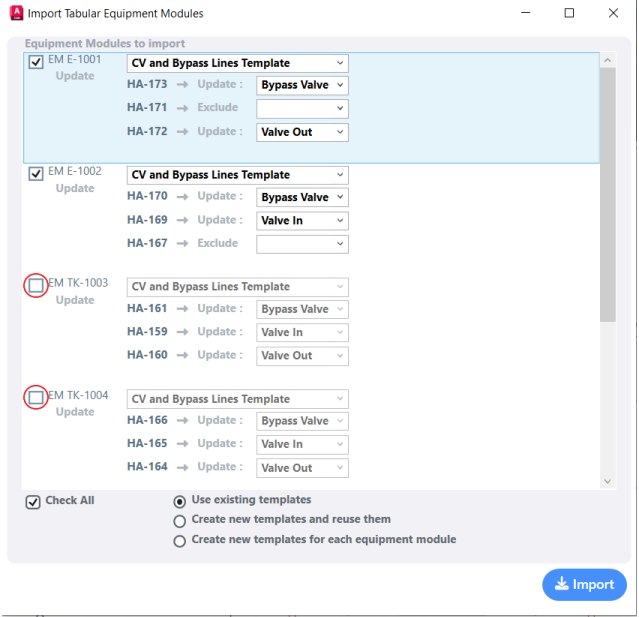
Now let’s analyze how the importer received our edited data:
EM-1001
We modified the status of Engineering Item HA-171 in one of the configurations, however the Template Item box now appears empty.

When we open the list of possible Template Items from the dropdown, we find that “Valve In“, which was the previous Template Item linked to this Engineering Item , now appears red. This is because the “CV and Bypass Lines Template“ is used in more than one Equipment Module. We see that Engineering Item HA-169 in EM E-1002 was also linked to this Template Item. By editing the State of the Engineering Item in a Configuration, it is now incompatible to use the same Template Item as before, since the other use case keeps its old values.
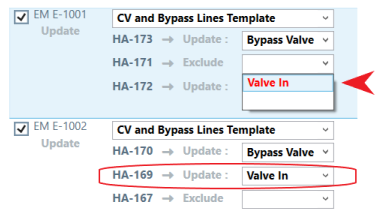
One of the ways to solve this is to type a new Template Item name for the Engineering Item to use, which will be assigned the edited values, while keeping the Template itself unchanged.
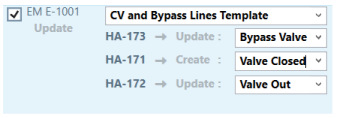
EM-1002
In this case, an Engineering Item was removed from the file, so it will appear as excluded in the importer and it will be unlinked from it’s previous Template Item.

P-1003
Engineering Item HA-156 was added to the Equipment Module, however no existing Template Item was found that was compatible with its Configuration States.
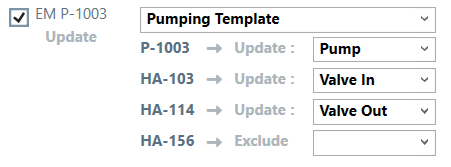
We can type a new Template Item to carry the values, which will in turn update the link status to “Create“.
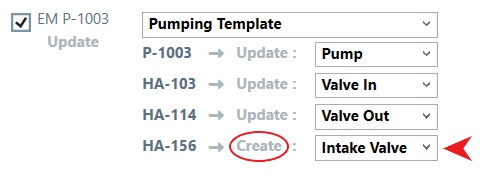
P-1004
For this Equipment Module we added a whole new Configuration, which means that it’s no longer compatible with any previous Template. Therefore, a new Template and Template Items were suggested.

Monitoring import results:
After the import has taken place, one of the ways we can look at the data is by opening the Equipment Module window circled in red from the Module Data window.
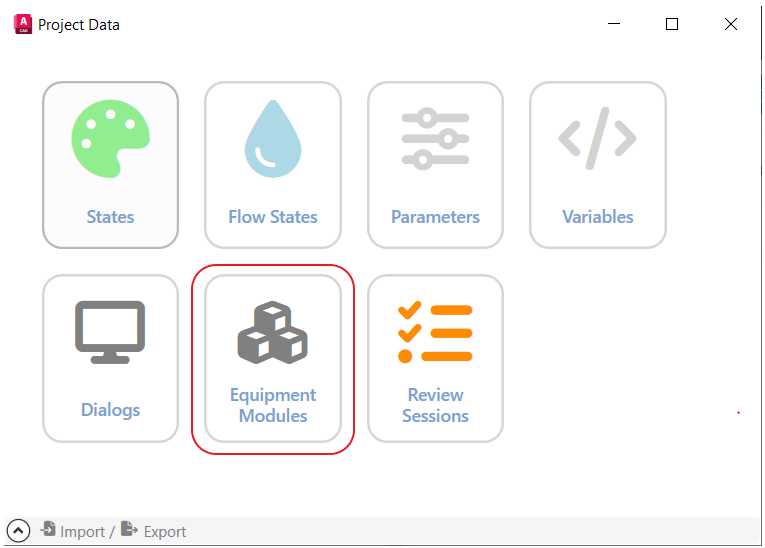
From there on, we are able to see that in EM-1001, the new Template Item “Valve Closed“ was linked to HA-171.
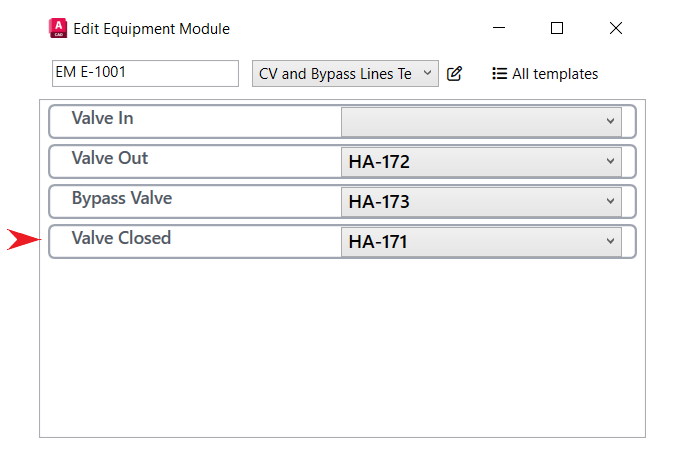
Its State was correctly updated in the Configuration.
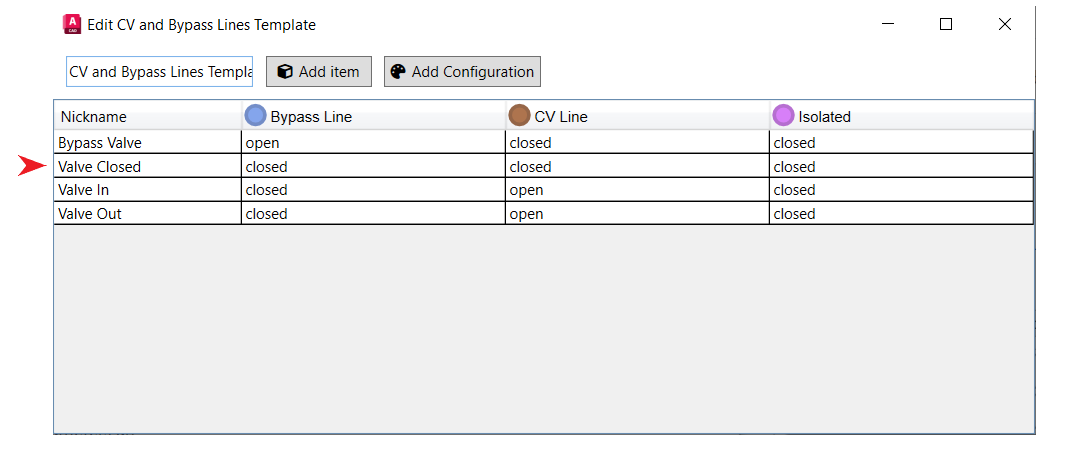
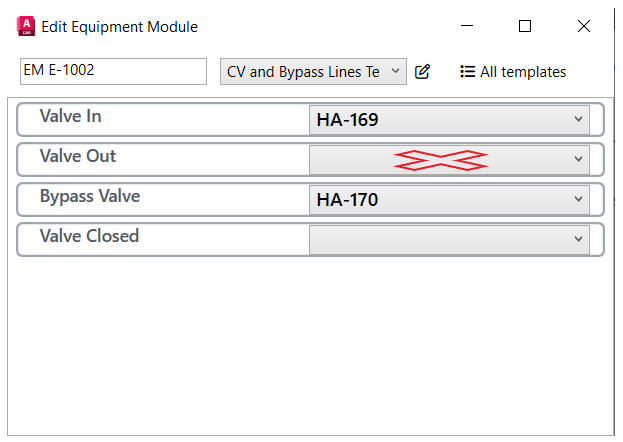
For EM-1002, the removed Engineering Item was unlinked from the “Valve Out“ Template Item.
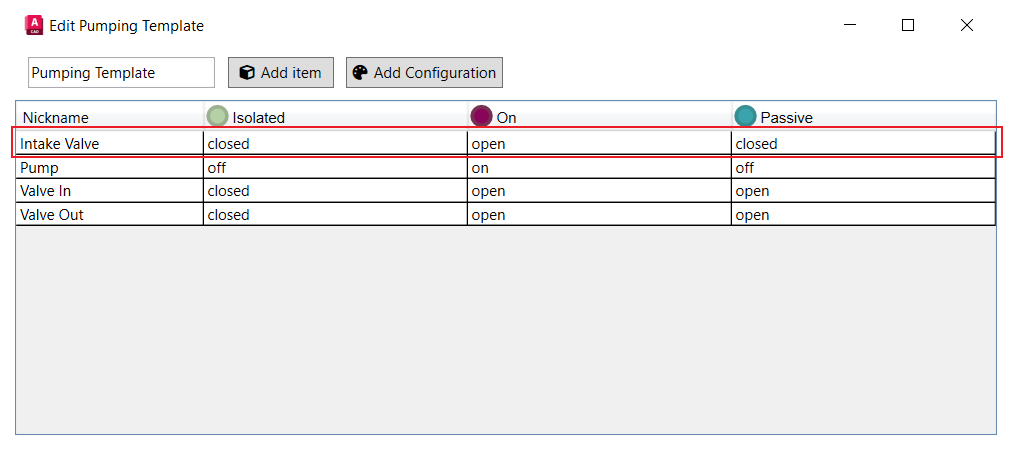
In EM P-1003, the newly added Engineering Item HA-156 was linked to the new Template Item “Intake Valve“.

Its values were correctly added to each Configuration.
For EM P-1004, the new “Template 1“ was created, together with the according Template Items for each Engineering Item.
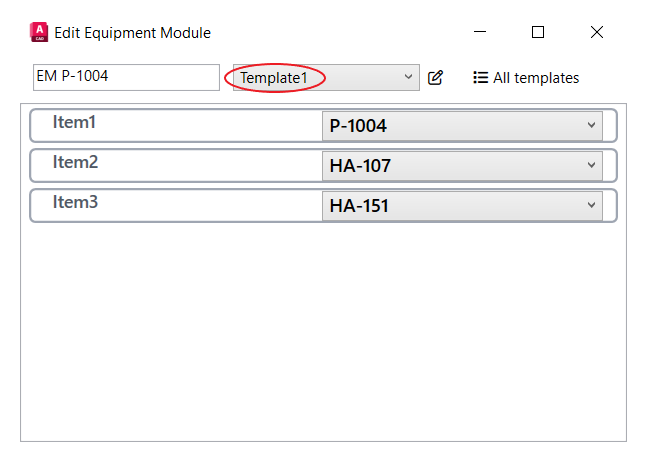
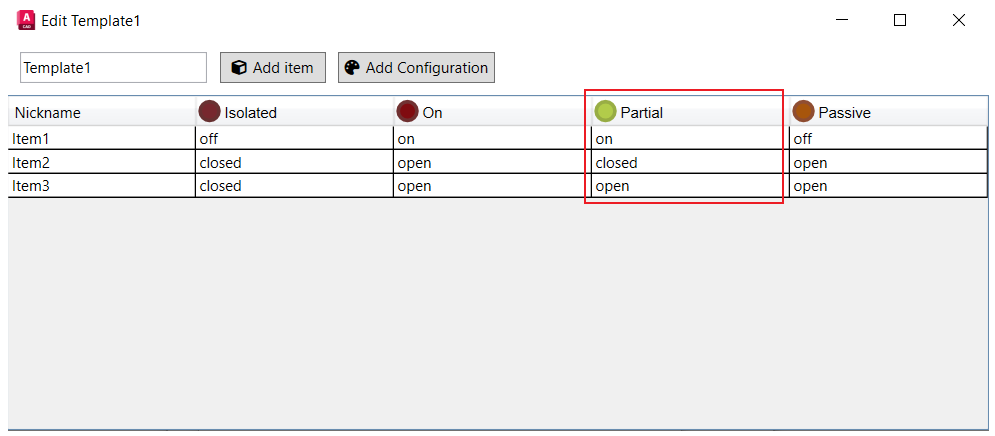
The newly added Configuration “Partial“ is now featured in this Template.
